

Hat Making Project
Leather Camellia
This stunning leather camellia can be worn as a brooch, a headpiece or used as a decoration on a hat.
Hat Making Project
Leather Camellia
This stunning leather camellia can be worn as a brooch, a headpiece or used as a decoration on a hat.
Projects / Leather Camellia
Project Overview
Based on a real camellia, this tutorial was written by international flower making expert Galina Kofod of Galelina Flowers. Galina used a real flower to come up with the design, increasing the number of petals for extra effect.
Unlike fabric or silk, there is no bias to worry about when working with leather. This means that the petals and leaves can be cut from leftovers and off cuts, so you can be much more economical with your materials.
Some argue that only thin leather can be used to make leather flowers. Galina, however, does not share this opinion. While some of her leather flower designs do demand thin leather, she feels that reasonably simple flowers, like this camellia, turn out well with almost any type of leather. For this project, she has used a fairly robust goat leather, with a thickness of just under 1 millimetre.
You will use traditional flower making tools and techniques to make a stunning leather camellia. The finished product can be worn as a brooch, a headpiece or used as a decoration on a hat.
“All of my students love making this flower and I am impressed myself with their creations,” says Galina. “I am sure, when you make this flower using my tutorial, you will add something of your own to make it unique.”
Category: Fascinators, Flower Making, Trimmings

Get Full Access
HATalk Subscribers – sign in below to view the instructions for this project.
Not a Subscriber yet? Sign up to begin your free trial and get instant access to all of our projects and e-magazines.
What You Need
- 30cm piece of leather for the petals – sheep, goat, pig or kangaroo kid leather will all work well.
- 10cm square of thin, green leather for the calyx and leaves.
- Printable template
- Pen – If you have one, a silver pen is great for tracing patterns. Otherwise, a normal pen will be fine.
- Flower stamens
- Crepe paper in the same colour as your stamens or petal leather.
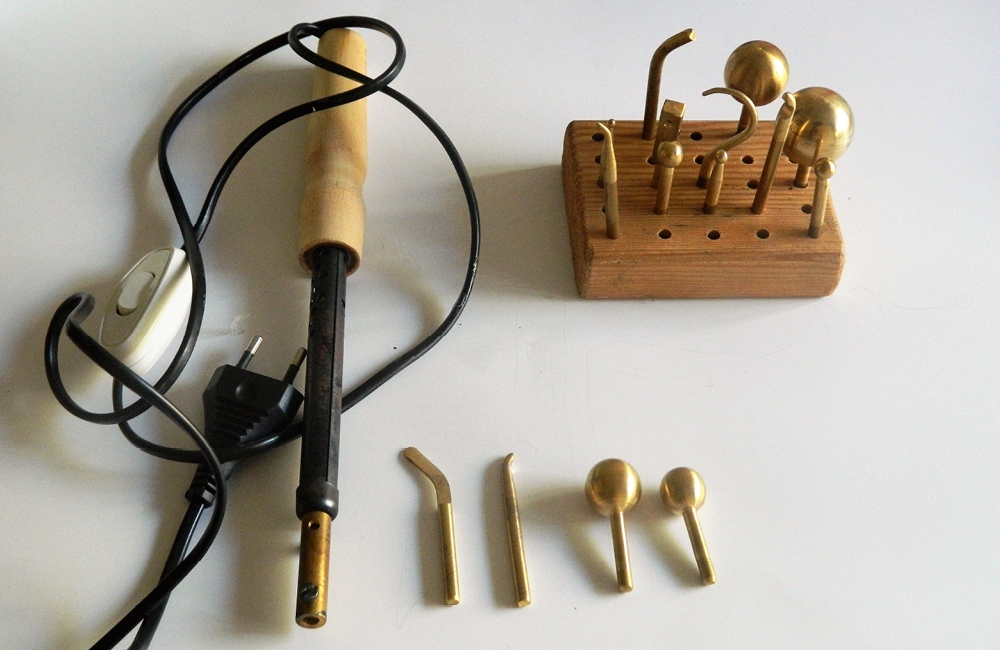
- Flower making tools (like those available from www.galelina.com.au). You will need a middle sized Japanese iron, a single knife and 2 radius ball tools (15mm and 20mm).
- Soldering iron – I recommend using a 40W soldering iron with an on/off switch.
- 2 sponges covered with cotton fabric to use with the flower making tools. Use a thick, soft sponge for the petals. For the leaves, use a half hard sponge. (If you don’t have any suitable sponges, you can fold a bath towel several times and cover it with cotton fabric instead.)
- Polyvinyl Alcohol Stiffener (PVA) – As with silk flower making, you need a stiffener that helps to preserve the shape of the flower. I use a Japanese PVA powder which can be mixed with water to create a clear non-toxic stiffening solution that you can keep in a container with a closed lid for several years. From 100 grams of powder, you can make 1.5 litres of stiffener.
- Small, flat brush for applying stiffener.
- Scissors
- Wire cutters
- Brooch pin or small hair clip
- Good quality, strong, clear glue
- Wood glue – I use a hard PVA Japanese glue. Normal wood glue from a hardware shop would also be fine.
- Millinery wire
- Florist wire – gauge 24,26,28 are best. Leather flowers are reasonably heavy and often require strong wire. In this lesson you won’t be making a stem, so any florist wire will be fine.
- An awl
Project Overview
Based on a real camellia, this tutorial was written by international flower making expert Galina Kofod of Galelina Flowers. Galina used a real flower to come up with the design, increasing the number of petals for extra effect.
Unlike fabric or silk, there is no bias to worry about when working with leather. This means that the petals and leaves can be cut from leftovers and off cuts, so you can be much more economical with your materials.
Some argue that only thin leather can be used to make leather flowers. Galina, however, does not share this opinion. While some of her leather flower designs do demand thin leather, she feels that reasonably simple flowers, like this camellia, turn out well with almost any type of leather. For this project, she has used a fairly robust goat leather, with a thickness of just under 1 millimetre.
You will use traditional flower making tools and techniques to make a stunning leather camellia. The finished product can be worn as a brooch, a headpiece or used as a decoration on a hat.
“All of my students love making this flower and I am impressed myself with their creations,” says Galina. “I am sure, when you make this flower using my tutorial, you will add something of your own to make it unique.”
Category: Fascinators, Flower Making, Trimmings
What You Need
- 30cm piece of leather for the petals – sheep, goat, pig or kangaroo kid leather will all work well.
- 10cm square of thin, green leather for the calyx and leaves.
- Printable template
- Pen – If you have one, a silver pen is great for tracing patterns. Otherwise, a normal pen will be fine.
- Flower stamens
- Crepe paper in the same colour as your stamens or petal leather.
- Flower making tools (like those available from www.galelina.com.au). You will need a middle sized Japanese iron, a single knife and 2 radius ball tools (15mm and 20mm).
- Soldering iron – I recommend using a 40W soldering iron with an on/off switch.
- 2 sponges covered with cotton fabric to use with the flower making tools. Use a thick, soft sponge for the petals. For the leaves, use a half hard sponge. (If you don’t have any suitable sponges, you can fold a bath towel several times and cover it with cotton fabric instead.)
- Polyvinyl Alcohol Stiffener (PVA) – As with silk flower making, you need a stiffener that helps to preserve the shape of the flower. I use a Japanese PVA powder which can be mixed with water to create a clear non-toxic stiffening solution that you can keep in a container with a closed lid for several years. From 100 grams of powder, you can make 1.5 litres of stiffener.
- Small, flat brush for applying stiffener.
- Scissors
- Wire cutters
- Brooch pin or small hair clip
- Good quality, strong, clear glue
- Wood glue – I use a hard PVA Japanese glue. Normal wood glue from a hardware shop would also be fine.
- Millinery wire
- Florist wire – gauge 24,26,28 are best. Leather flowers are reasonably heavy and often require strong wire. In this lesson you won’t be making a stem, so any florist wire will be fine.
- An awl
Get Full Access
HATalk Subscribers – sign in below to view the full instructions for this project.
Not a Subscriber yet? Sign up to begin your free trial and get instant access to all of our hat making projects and e-magazines.
