

Hat Making Project
Boater with Bounce
Learn traditional plaiting techniques from expert straw plaiter and author Veronica Main MBE.
Hat Making Project
Boater with Bounce
Learn traditional plaiting techniques from expert straw plaiter and author Veronica Main MBE.
Projects / Boater with Bounce
Project Overview
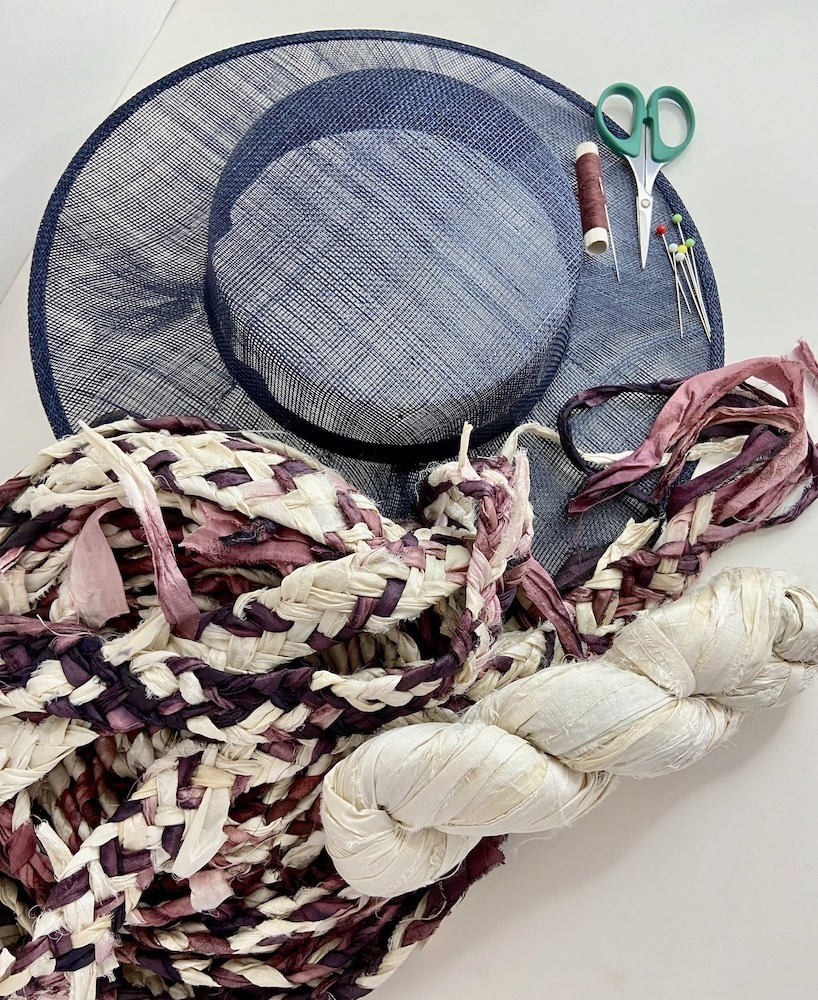
Boater hats fascinate me and, for this creation, the plaited silk provides a soft and bouncy contrast to the iconic hard outline associated with this shape. I used a seven-end plait for this hat but, with over 50 different patterns in my new book, Straw Plaiting: Heritage Techniques for Hats, Trimmings, Bags and Baskets, you will be spoiled for choice! The wider the plait, the shorter the length you will need to customise your boater hat.
Plaiting can be done anywhere, well almost anywhere, and is an ideal occupation for a long journey or a winter evening. Straw hats have always been made from a wide range of materials using whatever was available locally and, later, man-made fibres that provided an exciting change to hat fashion. I love working with wheat or rye straws but, for a quick project, it is often better to work with other materials, including recycled fabrics. This freedom to use a variety of materials is an important feature within my new book about straw plaiting for the hat industry.
For this project, I have chosen to use an ivory and cream hank of recycled sari silk which was then dip-dyed to create a unique colourway. This hat only needed one hank of recycled sari silk strips to make the five to six metres (5.5-6.5 yards) of plait. Once finished, the plait was stitched to a sinamay hat body, starting at the top centre of the crown (known in the trade as the button) then spiralling outwards, keeping the plait edge-to-edge. There is an under-brim, rather than a simple lining, to give it some depth. Less plait is needed if you prefer to line the under-brim with a complementary fabric.
Material Notes
The recycled sari silk hanks vary between suppliers and are often sold by weight, usually 100g (4oz). The length will vary according to the width of the strips. The hank used for this project had strips varying between 10mm and 20mm (0.4″ and 0.8″) wide, which provided about 10 metres of plait. Sari silk comes in a range of luscious colours and there is an enormous variety of shades within a single hank.
The ready-made sinamay boater hat body that I used has a brim diameter of 32.5cm (12.7″) and a crown height of 4.5cm (1.7″). The brim is wired. It was purchased from Petershams.com.

Get Full Access
HATalk Subscribers – sign in below to view the instructions for this project.
Not a Subscriber yet? Sign up to begin your free trial and get instant access to all of our projects and e-magazines.
What You Need
- One hank of sari silk strips
- Ready-made hat body of your choice
- Thread
- Needle
- Pins
Project Overview
Boater hats fascinate me and, for this creation, the plaited silk provides a soft and bouncy contrast to the iconic hard outline associated with this shape. I used a seven-end plait for this hat but, with over 50 different patterns in my new book, Straw Plaiting: Heritage Techniques for Hats, Trimmings, Bags and Baskets, you will be spoiled for choice! The wider the plait, the shorter the length you will need to customise your boater hat.
Plaiting can be done anywhere, well almost anywhere, and is an ideal occupation for a long journey or a winter evening. Straw hats have always been made from a wide range of materials using whatever was available locally and, later, man-made fibres that provided an exciting change to hat fashion. I love working with wheat or rye straws but, for a quick project, it is often better to work with other materials, including recycled fabrics. This freedom to use a variety of materials is an important feature within my new book about straw plaiting for the hat industry.
For this project, I have chosen to use an ivory and cream hank of recycled sari silk which was then dip-dyed to create a unique colourway. This hat only needed one hank of recycled sari silk strips to make the five to six metres (5.5-6.5 yards) of plait. Once finished, the plait was stitched to a sinamay hat body, starting at the top centre of the crown (known in the trade as the button) then spiralling outwards, keeping the plait edge-to-edge. There is an under-brim, rather than a simple lining, to give it some depth. Less plait is needed if you prefer to line the under-brim with a complementary fabric.
Material Notes
The recycled sari silk hanks vary between suppliers and are often sold by weight, usually 100g (4oz). The length will vary according to the width of the strips. The hank used for this project had strips varying between 10mm and 20mm (0.4″ and 0.8″) wide, which provided about 10 metres of plait. Sari silk comes in a range of luscious colours and there is an enormous variety of shades within a single hank.
The ready-made sinamay boater hat body that I used has a brim diameter of 32.5cm (12.7″) and a crown height of 4.5cm (1.7″). The brim is wired. It was purchased from Petershams.com.
What You Need
- One hank of sari silk strips
- Ready-made hat body of your choice
- Thread
- Needle
- Pins
Get Full Access
HATalk Subscribers – sign in below to view the full instructions for this project.
Not a Subscriber yet? Sign up to begin your free trial and get instant access to all of our hat making projects and e-magazines.
