

Hat Making Project
Bonnet Frame
Make a bonnet frame out of theatrical buckram.
Hat Making Project
Bonnet Frame
Make a bonnet frame out of theatrical buckram.
Projects / Bonnet Frame
Project Overview
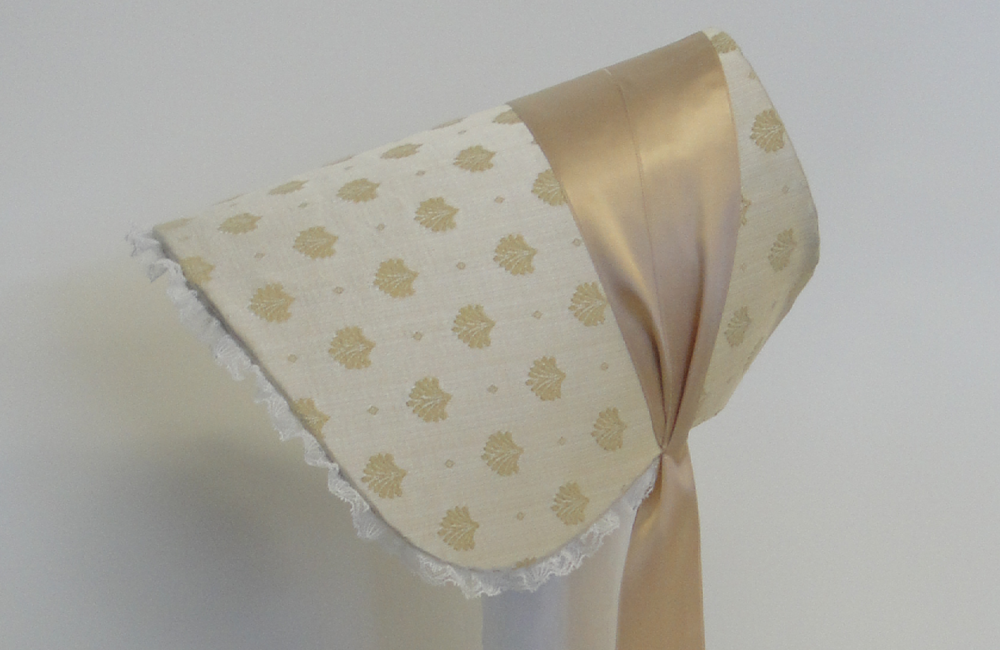
This project is the first in a two-part series on bonnet making by theatrical milliner Ani Townsend. In this tutorial, you will learn how to make a bonnet frame out of buckram. Later, you will go on to line, cover and trim the buckram foundation to create a finished bonnet.
While bonnets may not be in vogue these days, they were an extremely popular headwear style for women for hundreds of years. If you are making costumes for a period stage or film production, or perhaps a historical reenactment, then this bonnet frame project will be a big help. For her example piece, Ani has made a poke bonnet (circa 1830s). By completing this project, you will learn how to make your own pattern so you can experiment with different bonnet styles and shapes.
If your bonnet is going to be worn in a stage production, then it is a good idea to use a heavy grade buckram for your base. Also referred to as theatrical buckram, this coarse material is extremely strong and resilient and will withstand harsh treatment and constant wear. As a young milliner, Ani watched an actor, playing drunk in a performance of The Merry Widow, fall flat upon the top hat which she had just created. Since then, she tends to opt for the robust heavy grade buckram. However, if you are confident that your bonnet is going to be well taken care of, a more lightweight variety of buckram can definitely be substituted. In fact, to achieve an even softer and lighter feel, Ani says that bonnet bases can be made out of four or five layers of fused sinamay.
This bonnet frame tutorial was written by theatrical milliner Ani Townsend of the Milliners Guild in Bristol, England.
Category: Hats

Get Full Access
HATalk Subscribers – sign in below to view the instructions for this project.
Not a Subscriber yet? Sign up to begin your free trial and get instant access to all of our projects and e-magazines.
What You Need
- Dolly Head/Mannequin
- Thick Paper and Pen
- Pins
- Scissors
- Heavy Grade Buckram
- Permanent Marker
- Iron and Ironing Board
- Copydex (Rubber Cement)
- Hair Dryer
- Needle and Thread
- Steel Spring Wire
- Cotton Bias Binding
Project Overview
This project is the first in a two-part series on bonnet making by theatrical milliner Ani Townsend. In this tutorial, you will learn how to make a bonnet frame out of buckram. Later, you will go on to line, cover and trim the buckram foundation to create a finished bonnet.
While bonnets may not be in vogue these days, they were an extremely popular headwear style for women for hundreds of years. If you are making costumes for a period stage or film production, or perhaps a historical reenactment, then this bonnet frame project will be a big help. For her example piece, Ani has made a poke bonnet (circa 1830s). By completing this project, you will learn how to make your own pattern so you can experiment with different bonnet styles and shapes.
If your bonnet is going to be worn in a stage production, then it is a good idea to use a heavy grade buckram for your base. Also referred to as theatrical buckram, this coarse material is extremely strong and resilient and will withstand harsh treatment and constant wear. As a young milliner, Ani watched an actor, playing drunk in a performance of The Merry Widow, fall flat upon the top hat which she had just created. Since then, she tends to opt for the robust heavy grade buckram. However, if you are confident that your bonnet is going to be well taken care of, a more lightweight variety of buckram can definitely be substituted. In fact, to achieve an even softer and lighter feel, Ani says that bonnet bases can be made out of four or five layers of fused sinamay.
This bonnet frame tutorial was written by theatrical milliner Ani Townsend of the Milliners Guild in Bristol, England.
Category: Hats
What You Need
- Dolly Head/Mannequin
- Thick Paper and Pen
- Pins
- Scissors
- Heavy Grade Buckram
- Permanent Marker
- Iron and Ironing Board
- Copydex (Rubber Cement)
- Hair Dryer
- Needle and Thread
- Steel Spring Wire
- Cotton Bias Binding
Get Full Access
HATalk Subscribers – sign in below to view the full instructions for this project.
Not a Subscriber yet? Sign up to begin your free trial and get instant access to all of our hat making projects and e-magazines.
